


All Indonesia Arrival Card (2026): What It Is, Who Needs It, and How to Fill It

Planning to enter Indonesia? There’s a new digital arrival system you should know about. The All Indonesia Arrival Card is an integrated digital arrival declaration that handles your entry paperwork in one place.
What Is the All Indonesia Arrival Card?
The All Indonesia Arrival Card is an integrated digital arrival declaration the government is rolling out. It combines immigration, customs (e-CD), and health/quarantine into one form.
Instead of filling out separate customs declarations, health forms, and immigration paperwork, this system lets you complete everything through a single online submission. The goal is to streamline the entry process for international travelers.
📅 Latest Update (August 27, 2025): Reported activation: Airlines cite Transport Directorate letter No. AU.006/3/17/DAU/2025, indicating a grand launch targeted for 18 Aug 2025; several travel trade advisories say ‘effective 18 Aug’. Official Immigration communications still frame All Indonesia as a trial in rollout. Access the system at allindonesia.imigrasi.go.id.
Is the All Indonesia Arrival Card Mandatory?
At entry points where All Indonesia is live, airlines instruct passengers to complete it within 3 days (72h) before arrival. If your entry point isn’t live yet, you must still complete the Customs e-CD (which is mandatory for everyone) and follow any active SATUSEHAT Health Pass requirements.
| Period / Date | Where the All Indonesia Arrival Card is Mandatory | Notes |
|---|---|---|
| From 1 September 2025 |
Airports: Jakarta – Soekarno-Hatta (CGK), Bali – Ngurah Rai (DPS), Surabaya – Juanda (SUB) Seaports (Batam): Batam Centre, Nongsa, Marina, Sekupang, Harbour Bay, Bengkong |
Fill out digitally ≤ 72h before arrival; show QR code upon entry. |
| From 1 October 2025 | All international airports in Indonesia; gradually also all seaports and land border points | Nationwide requirement; replaces separate customs/health forms. |
Here’s what applies to different travelers:
- Foreign visitors: Must complete the arrival declaration at all Indonesian entry points
- Indonesian citizens: Must complete when returning from overseas
- Business travelers and tourists: Same requirements apply
- Visa holders and visa-exempt travelers: Still need the arrival declaration
🛫 Airline Advisory: Airlines serving Indonesia are informing passengers about completion requirements during check-in, where the system is implemented.
When to Complete Your Digital Entry Declaration
All Indonesia: Complete ≤ 72h before arrival.
e-CD (fallback): Complete ≤ 2 days before arrival and up to 1 day after if needed.
The process typically takes a few minutes when you have your travel documents ready. Complete it when you’re preparing other travel arrangements to avoid last-minute rushing.
Official Links (Free!)
Use only these official, free websites:
All Indonesia System: allindonesia.imigrasi.go.id
Customs Fallback: ecd.beacukai.go.id (e-CD customs declaration)
Use our service
If you don’t want to be bothered with formalities shortly before your departure or upon arrival, you can use our Arrival Card Service. For a small fee, we fill in the card just before your departure and email it to you. You can book this service here: Indonesia Arrival Card Service.
🚨 Avoiding Scam Sites
Authorities have flagged examples of fake e-CD domains (e.g., indonesianecd.com). Remember:
- e-CD is free if you do it yourself and is only available at ecd.beacukai.go.id or allindonesia.imigrasi.go.id.
- Legitimate sites end in .go.id (Indonesian government domains)
- Some non-go.id sites are charging high fees and portrait themselves as the official site (scam)
DIY Step-by-Step Guide: How to Fill All Indonesia Arrival Card
Here’s how to fill out your All Indonesia arrival card:
Step 1: Select “Foreign Visitor”
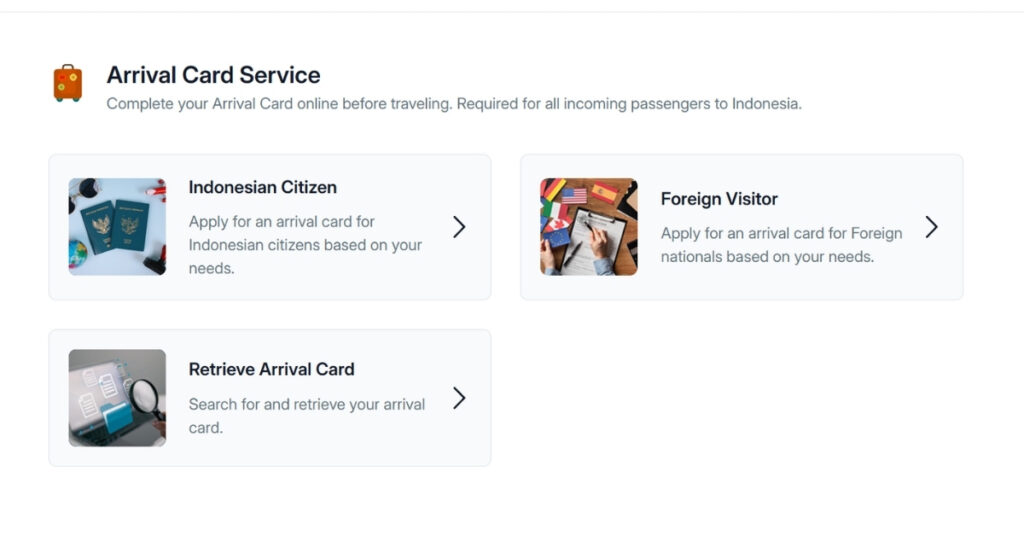
Visit allindonesia.imigrasi.go.id and choose Foreign Visitor (Indonesian citizens select the appropriate option).
Step 2: Enter Personal Information
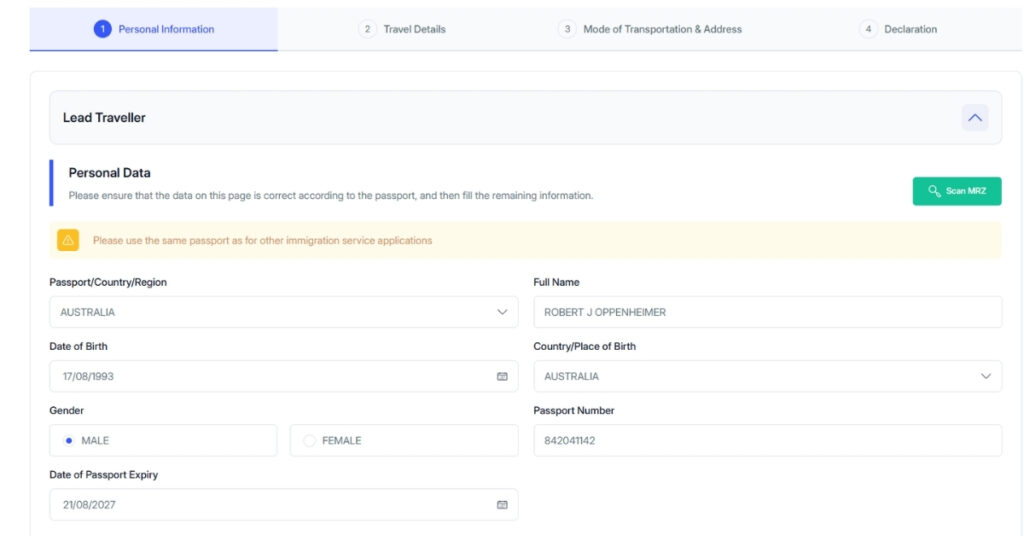
Start by entering your passport and personal details:
- Passport/Country/Region: Select your passport country from the dropdown
- Full Name: Enter exactly as shown on your passport
- Date of Birth: Use the date picker (DD/MM/YYYY format)
- Country/Place of Birth: Select from the dropdown menu
- Gender: Choose Male or Female
- Passport Number: Enter precisely as shown (numbers and letters)
- Date of Passport Expiry: Use the date picker
Pro tip: Use the “Scan MRZ” button to automatically fill passport details from your passport’s machine-readable zone.
Step 3: Travel and Visa Information

Fill in your trip information:
- Arrival Date to Indonesia: Use the date picker (DD/MM/YYYY)
- Departure Date from Indonesia: Select your planned exit date
- Do you already have a Visa or KITAS/KITAP? Choose Yes or No
Note: “You can apply for a Visa on Arrival after you have completed the Arrival Card
Step 4: Transporation Details
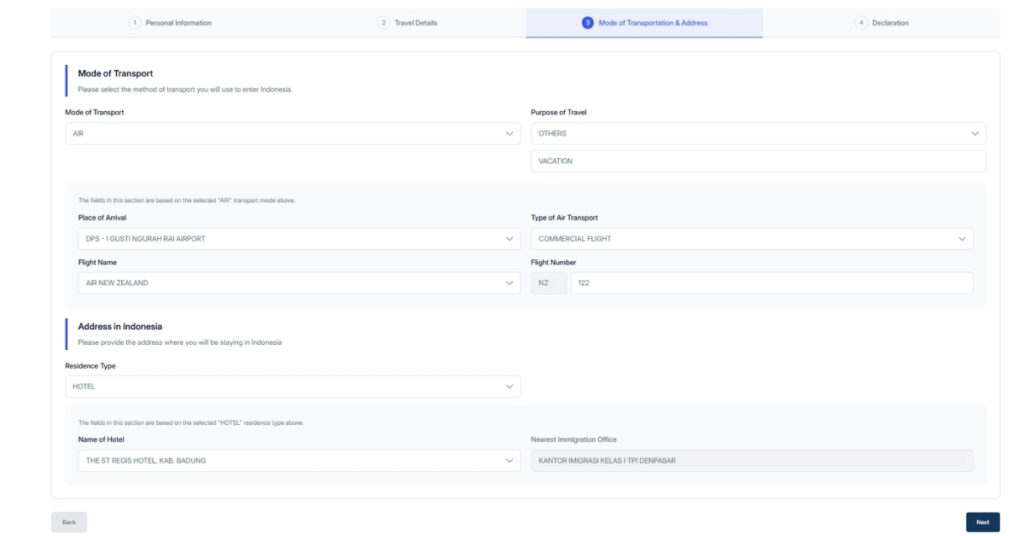
Complete your travel and accommodation details:
- Mode of Transport: Select AIR or SEA
- Purpose of Travel: Choose from dropdown (VACATION, BUSINESS, etc.)
- Place of Arrival: Select your entry airport/port (e.g., “DPS – I GUSTI NGURAH RAI AIRPORT”)
- Type of Air Transport: Usually “COMMERCIAL FLIGHT”
- Flight Name: Select your airline from dropdown
- Flight Number: Enter airline code and number (e.g., “NZ 122”)
- Residence Type: Choose HOTEL, PRIVATE, etc.
- Name of Hotel: Select or enter your accommodation
- Nearest Immigration Office: This auto-fills based on your location
Step 5: Declaration (Health, Quarantine & Customs)
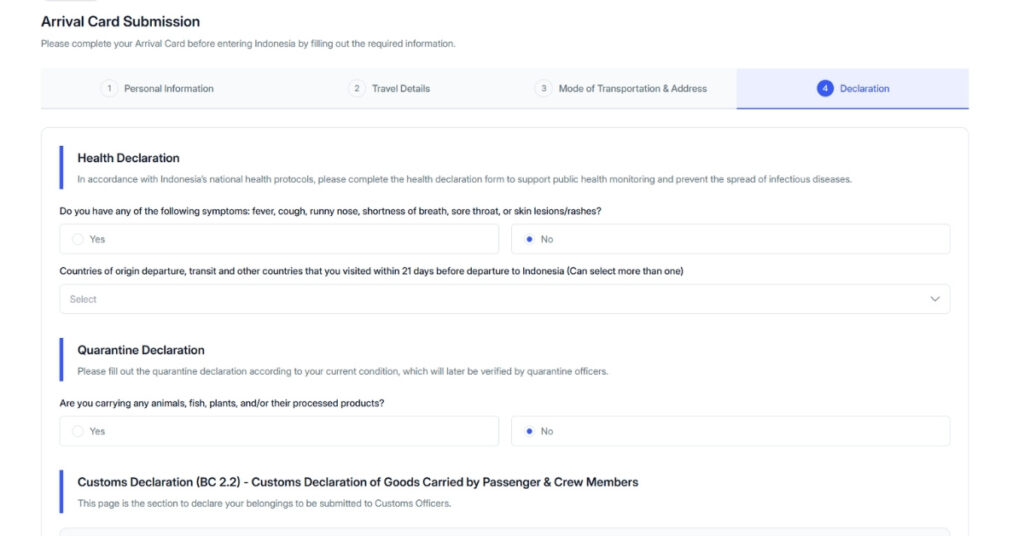
Complete the mandatory declarations:
Health Declaration:
- Symptom check: Answer if you have fever, cough, runny nose, shortness of breath, sore throat, or skin lesions/rashes
- Travel history: Select countries visited within 21 days before departure to Indonesia
Quarantine Declaration:
- Answer if you’re carrying animals, fish, plants, and/or their processed products
Customs Declaration (BC 2.2):
- Declare belongings you’re bringing into Indonesia
Step 6: Review and Submit
- Double-check all information for accuracy
- Submit your completed form
- You’ll receive a confirmation with:
- Arrival Card Number (e.g., 2508270027473)
- QR Code for airport use
- Submission status: “Submitted”
Step 7: Download Your QR Code
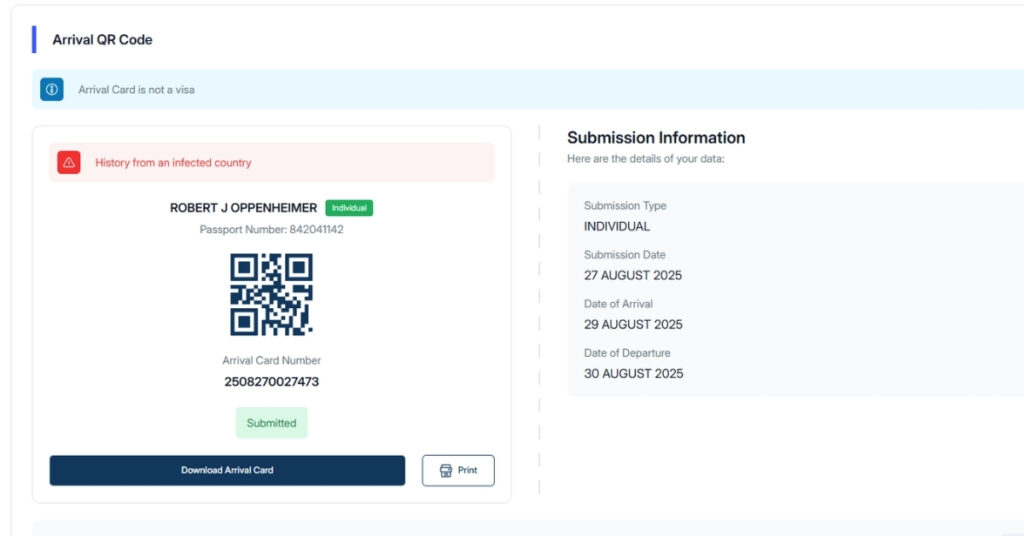
- Click “Download Arrival Card” to save the QR code
- Use the “Print” option if you want a hard copy
- Save the QR code offline on your mobile device
Important notes:
- If you make an error, submit a new declaration; keep the latest QR code
- The system shows “Arrival Card is not a visa” – remember this doesn’t replace visa requirements
- Each submission generates a new QR code and arrival card number
Families, Groups, and Special Cases
Family travel:
- All Indonesia: Add family members in the form; each person receives their own QR
- e-CD: One submission can include family members traveling together
Special situations:
- Transit passengers: Complete a declaration only if you clear immigration
- Cruise arrivals: Check if your port supports the All Indonesia system
- Children: Need their own record/QR under All Indonesia; for e-CD, they can be included under a family submission.
If Your Port Doesn’t Support All Indonesia Yet
Use these fallback procedures:
- Complete e-CD customs declaration at ecd.beacukai.go.id
- Health requirements: SATUSEHAT Health Pass may be required per current health advisories
- Save QR codes offline on your mobile device
- IMEI registration: Required only if using local SIM >90 days or importing devices over allowance
Keep digital copies accessible during travel in case of internet connectivity issues.
At the Airport: Using Your Arrival Declaration
Here’s what happens when you arrive:
Customs: Your QR code is scanned at the Customs inspection area.
Immigration: Officers check your passport/visa; some airports may also verify the All Indonesia QR if integrated.
Keep your QR code ready: Save it offline and consider having a backup. Airport Wi-Fi can be unreliable.
Special Considerations for Bali Travelers
Ngurah Rai Airport (DPS) travelers should note:
The Bali Tourist Levy (IDR 150,000) is separate from your arrival declaration. Pay via Love Bali before arrival; show your own QR if asked.
Complete your All Indonesia arrival card first, then handle the tourist levy separately.
Current Status and Implementation
The government is trialling All Indonesia and expanding its use; official messaging points to broader operation as readiness milestones are met.
Key points:
- The system combines health, customs, and immigration declarations
- It supplements but does not replace visa requirements
- Implementation is gradual across Indonesia’s entry points
- Fallback systems remain available where All Indonesia isn’t active
Final Tips for Your Indonesia Arrival
Timing requirements:
- All Indonesia: Fill ≤72h before arrival
- e-CD fallback: Fill ≤2 days before arrival (or up to 1 day after)
Remember:
- Save QR codes offline
- The Arrival Card does not replace a visa
- Bali levy is separate
- Keep backup documentation accessible
The All Indonesia system aims to simplify entry procedures while maintaining security requirements. As implementation expands, the process should become more consistent across all Indonesian entry points.
Safe travels!
Ready to Apply or Extend Your Visa?
Let our visa specialists handle your application.