










How to Apply for the Indonesia C11 Exhibition Visa Online: Step-by-Step Guide (2026)

Already confirmed that the C11 Exhibition Visa is the right visa for your role at an exhibition, trade fair, or MICE event in Indonesia? This guide shows you what happens next.
We walk through the Visa-Indonesia.com application flow step by step and screenshot by screenshot, from selecting the C11 product and paying for your order to completing the application form, uploading your documents, and receiving your e-Visa. If you are still deciding whether C11 is the correct visa for your event role, read our complete C11 Exhibition Visa guide first.
Already know the basics and just want the steps? Jump straight to the step-by-step guide →
C11 Visa Application at a Glance
- Visa type: Single-entry exhibitor visa (C11)
- Who needs it: Exhibitors who participate to market goods or services at exhibitions, trade fairs, and MICE events in Indonesia
- Length of stay: Up to 60 days from arrival
- Extendable: No, 60 days is the maximum stay under this visa
- Guarantor: Required for every application. You cannot apply for the C11 visa on your own — Visa-Indonesia.com acts as your official guarantor and submits the supporting documents on your behalf
- Documents you’ll need: Valid passport, recent photo, bank statement, and an invitation letter from the exhibition or hosting organization
- How many can you order at once: Multiple visas can be purchased in a single order, for example for your whole exhibition team
- Payment methods: Bank transfer, credit/debit card, Apple Pay/Google Pay, and cryptocurrency (available methods depend on your currency and order total)
- What happens after payment: You’ll be redirected to the official application form to submit your full details and documents
Last verified: August 2026. Prices, add-ons, and screenshots may change slightly over time as we improve the website. This guide reflects the current ordering process on Visa-Indonesia.com.
Table of Contents
What You’ll Need Before You Start
Having these ready before you begin will make the process faster:
✓ A valid passport, with at least 6 months of validity remaining from your date of entry into Indonesia
✓ A recent color photo of yourself
✓ A personal bank statement from the last three months with a closing balance of USD 2000 or equivalent
✓ An invitation letter from the exhibition organizer or hosting institution, confirming your participation, role, and the event details
✓ Hotel address in Indonesia
✓ Flight details (if you already booked the flights)
✓ Your basic travel details (name, nationality, contact information)
You do not need to upload any of these documents yet to place your order. The purchase itself only asks for basic contact information (name, email, phone number) — the full document upload happens afterward, once your payment is confirmed. More on that below.
How Much Does the C11 Visa Cost?
The C11 visa is priced per applicant, with an optional Indonesia Arrival Card add-on (more on that later). Prices are shown automatically in your local currency and update depending on the payment method you choose, since some methods carry a processing fee.
You can change the currency on our website on the top right corner on desktop or in the menu on your mobile device.
If you have a discount code — for example, from a partner exhibition, an event organizer, or a promotion — you can apply it during checkout before you pay. We’ll show you exactly where in Step 5 of the purchase process below.
Step-by-Step: How to Order Your C11 Visa Online
Step 1: Open the C11 Visa product page
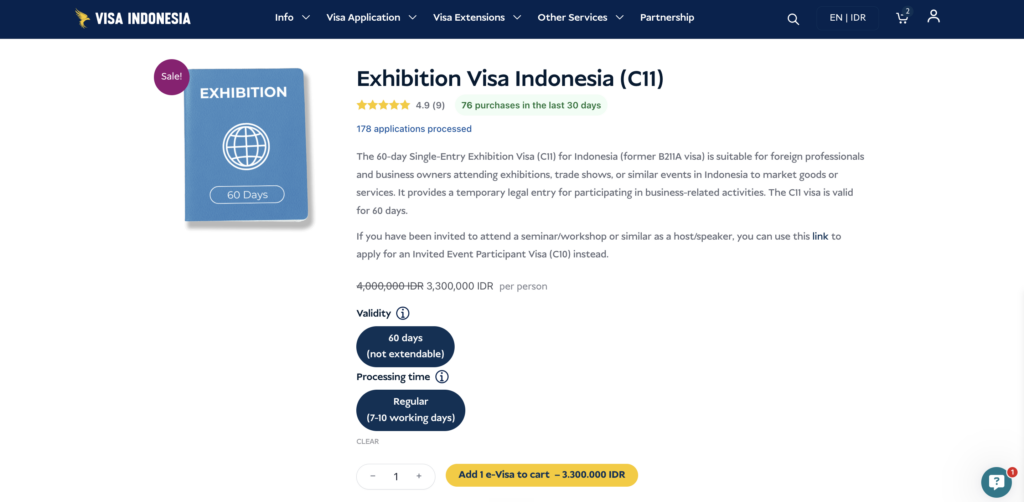
Go to the Exhibition Visa (C11) page on Visa-Indonesia.com. Here you’ll find the visa description, validity, processing time options, and price.
Step 2: Choose your options and add the visa to your cart
Select the processing time, set the quantity, and click “Add e-Visa to cart.”
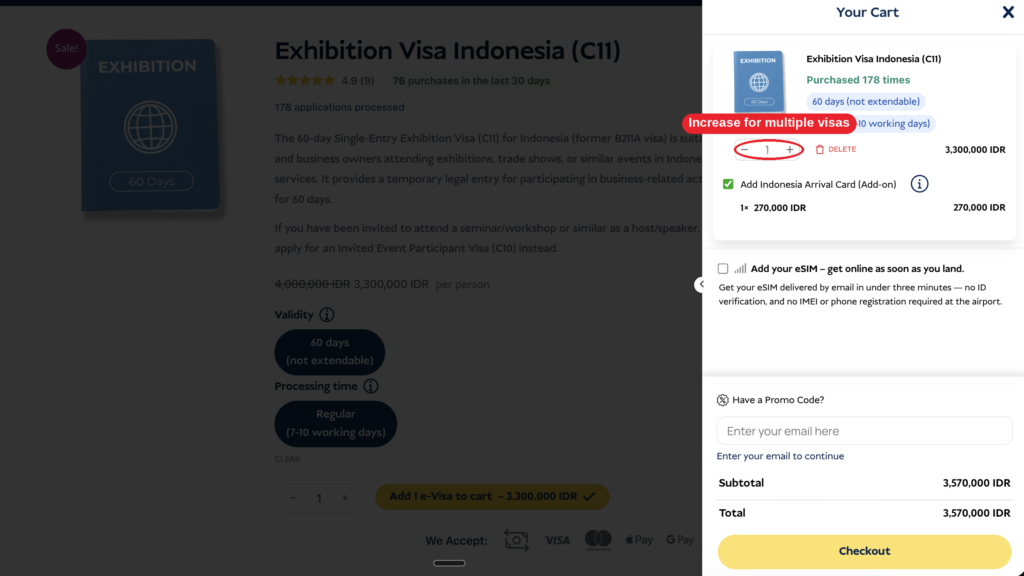
Applying for more than one person? If your whole team is attending the same exhibition, you can order several visas in a single purchase. Simply increase the quantity here before checking out. You’ll enter each traveler’s details separately at checkout — we’ll show you exactly how in Step 6.
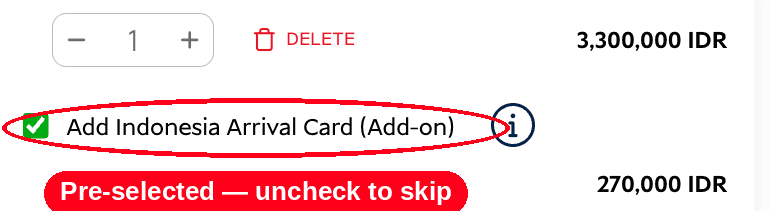
Step 3: Decide on the Indonesia Arrival Card add-on
When you add the C11 visa to your cart, the Indonesia Arrival Card service is automatically selected in the same quantity. Keep it if you want us to handle the declaration for you, or uncheck it and complete the official All Indonesia form yourself for free within 72 hours before arrival. For the full process, see our Arrival Card Guide.
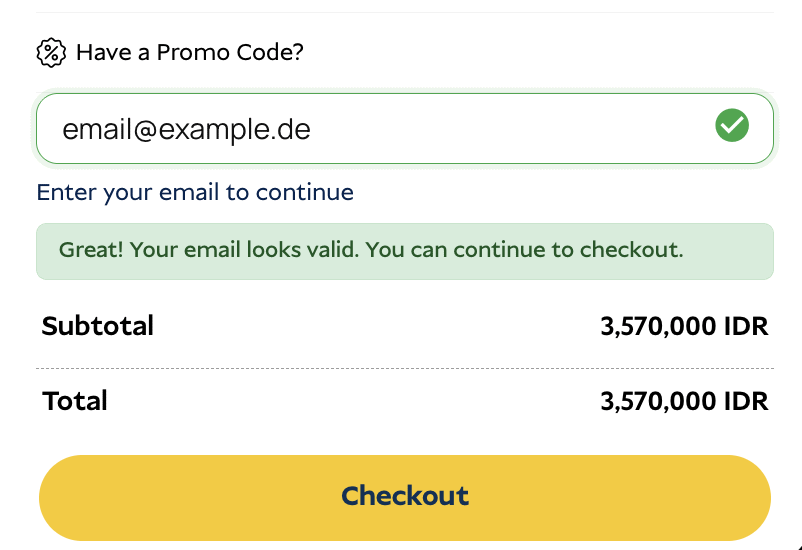
Step 4: Enter your email address
In the cart, enter the email address you’d like your order confirmation and updates sent to. Once it’s valid, you’ll see a green confirmation message and the option to continue.
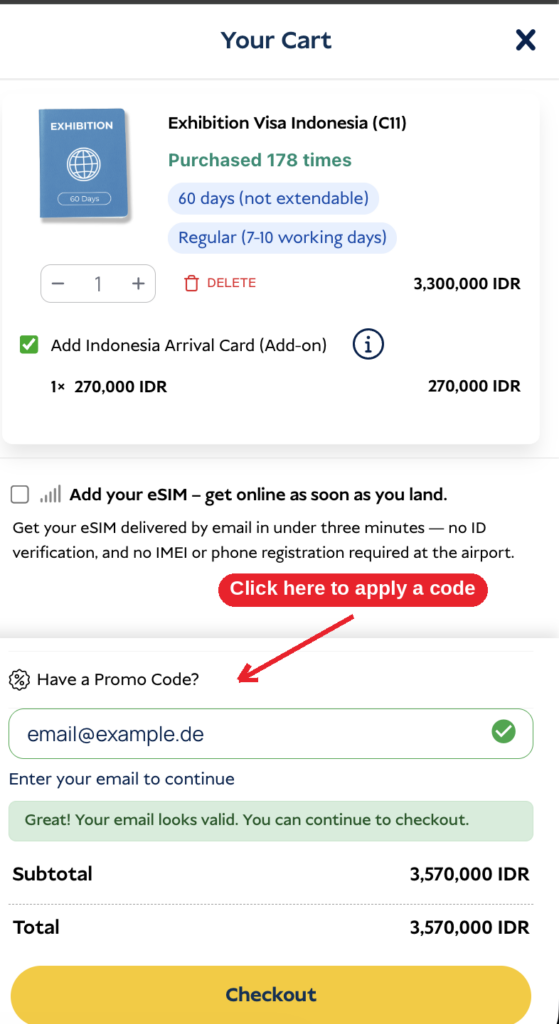
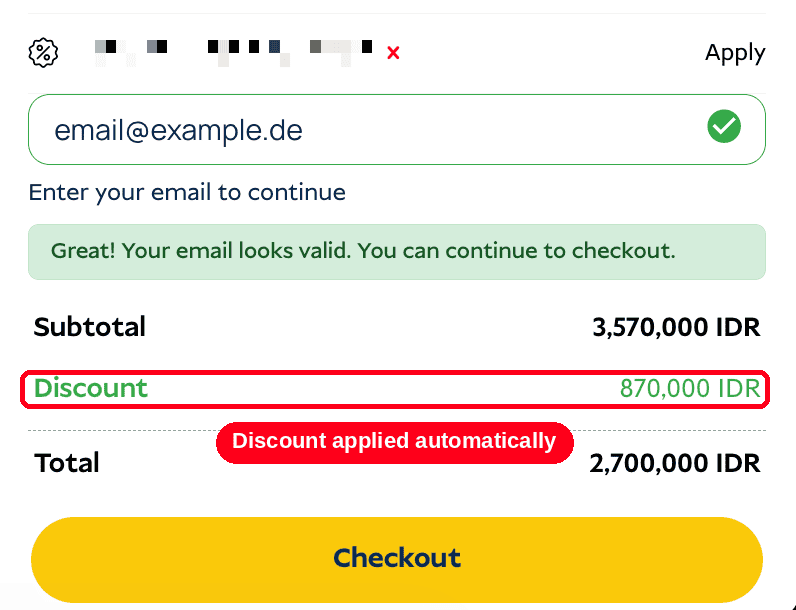
Step 5: Have a discount code? Here’s how to apply it
If you have a promo code, open “Have a Promo Code?”, enter the code, and confirm it before checkout. Check that the total updates correctly; if you do not have a code, skip this step.
Enter your code and confirm.
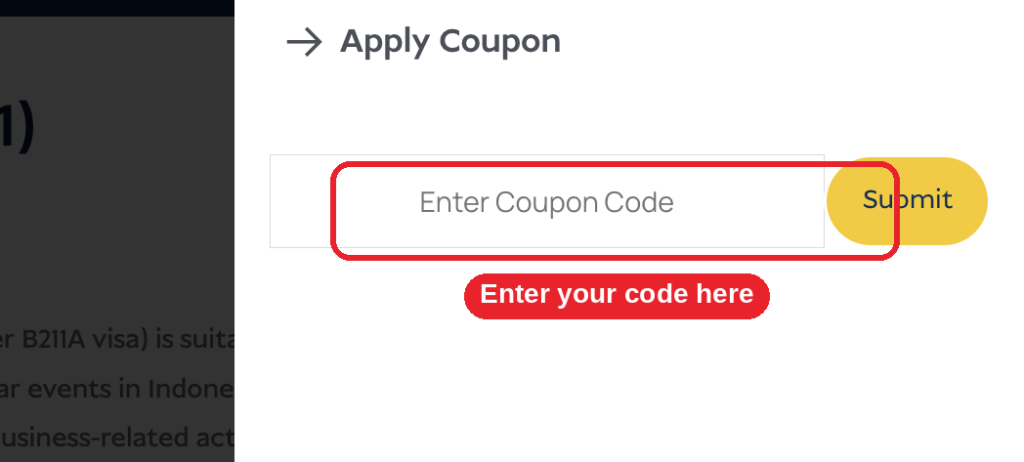
Once applied, your discount is deducted immediately, and your new total is shown.
Click “Checkout” to continue.
Step 6: Go to checkout and enter your details
On the checkout page, fill in the traveler’s details: nationality, first/middle/last name, phone number, and email address.
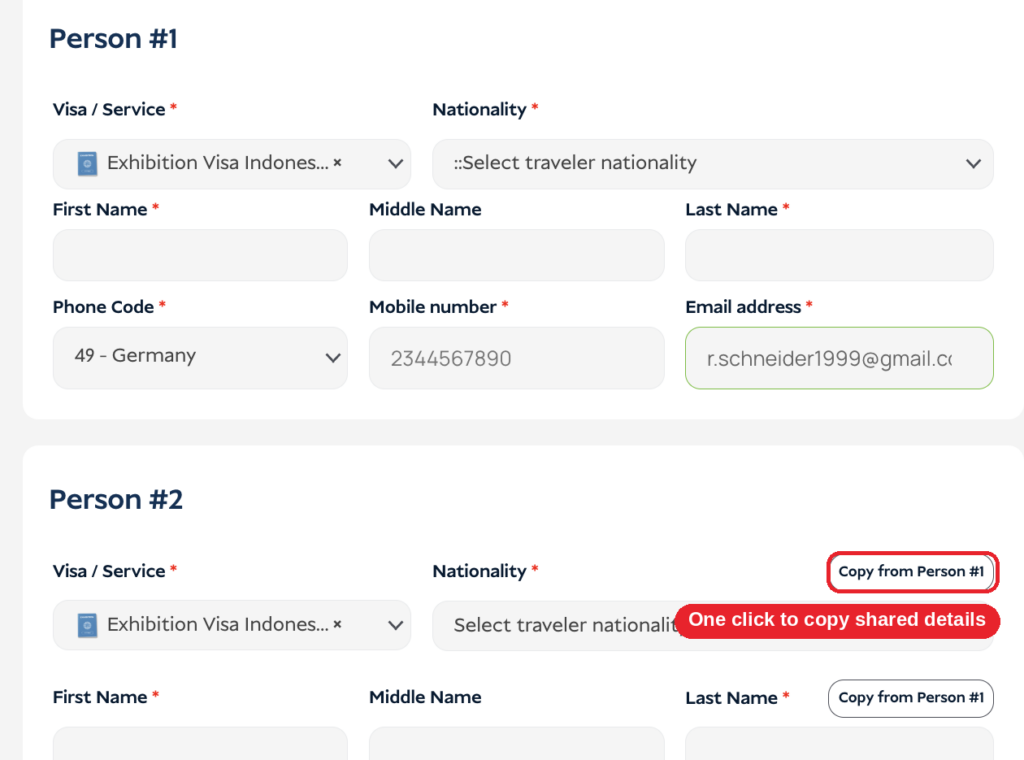
If you’re ordering for more than one person, each traveler gets their own “section”.
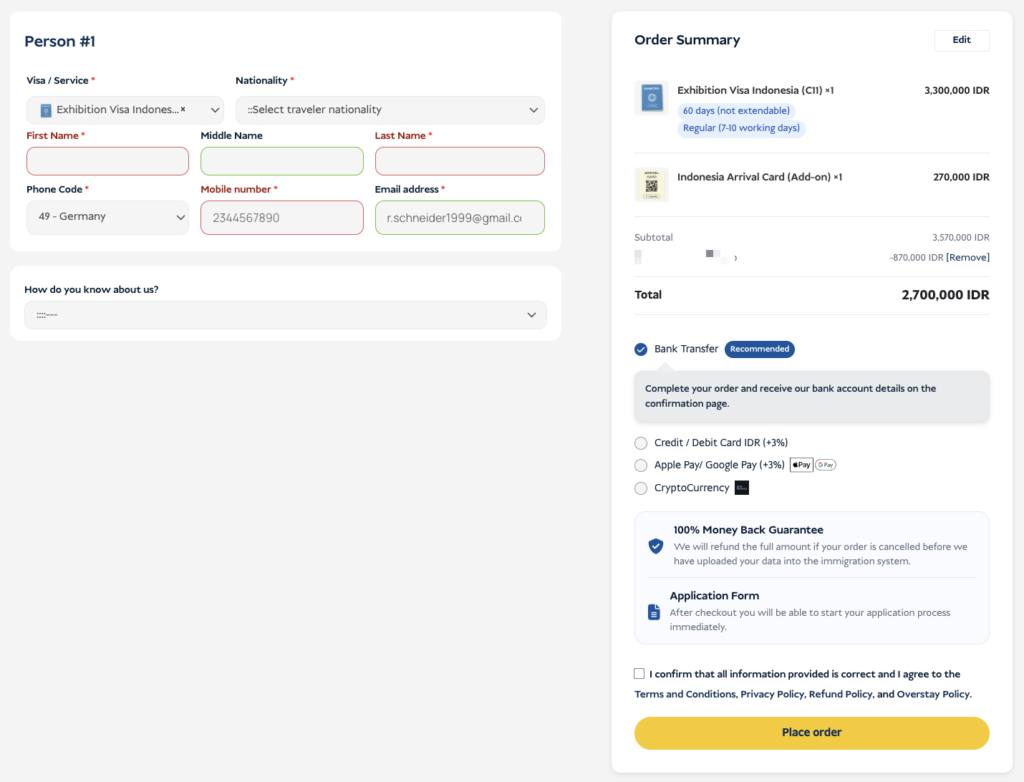
Important: Placing your order is not the same as submitting your visa application. Checkout only collects the essentials — your full application and document upload happen afterward, once your payment is confirmed.
If you’re ordering for more than one person, you’ll see a “Person #2,” “Person #3,” and so on for each additional traveler, each with its own “Copy from Person #1” shortcut for shared details:
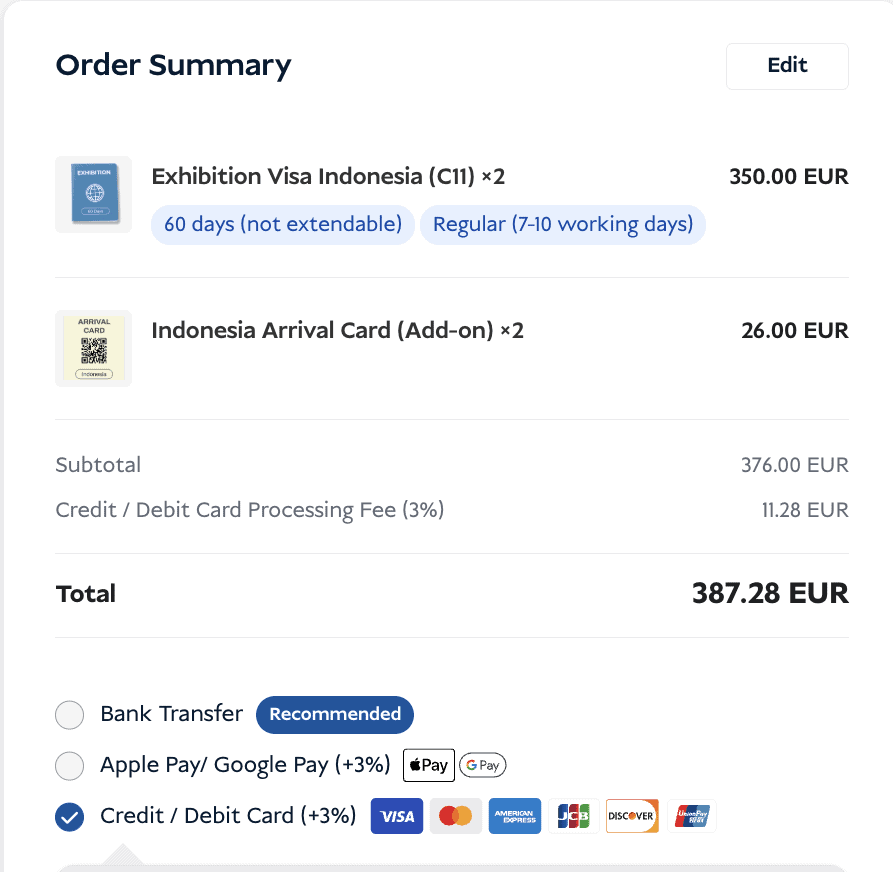
Step 7: Choose your payment method
Select how you’d like to pay. All available payment options, depending on the currency and the amount, will be visible. Please note that there might be a small payment fee depending on the payment option. All total prices are visible on our website.
Step 8: Place your order
Confirm that your information is correct, agree to the terms, and click “Place order.” You’ll briefly see a loading screen while your order is processed.
Step 9: Check your confirmation
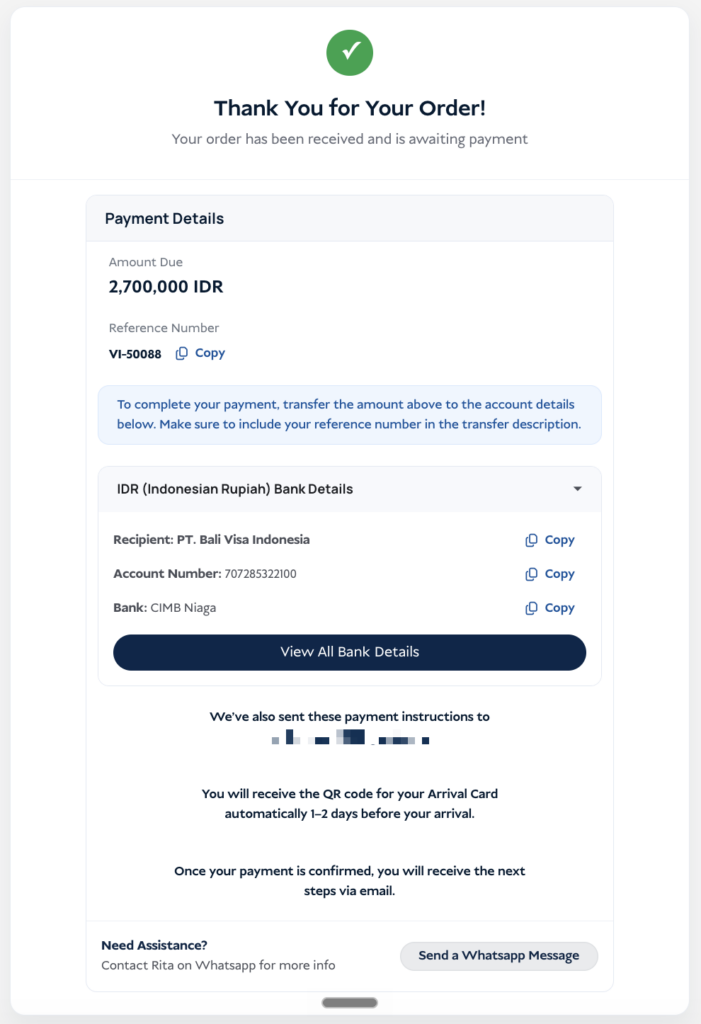
Once your order is placed, you’ll land on a confirmation page showing your amount due, reference number, and (if you chose bank transfer) our bank account details. Always include your reference number in the transfer description so we can match your payment quickly.
If you choose a different payment option, you will be directed to the payment provider to proceed with the payment.
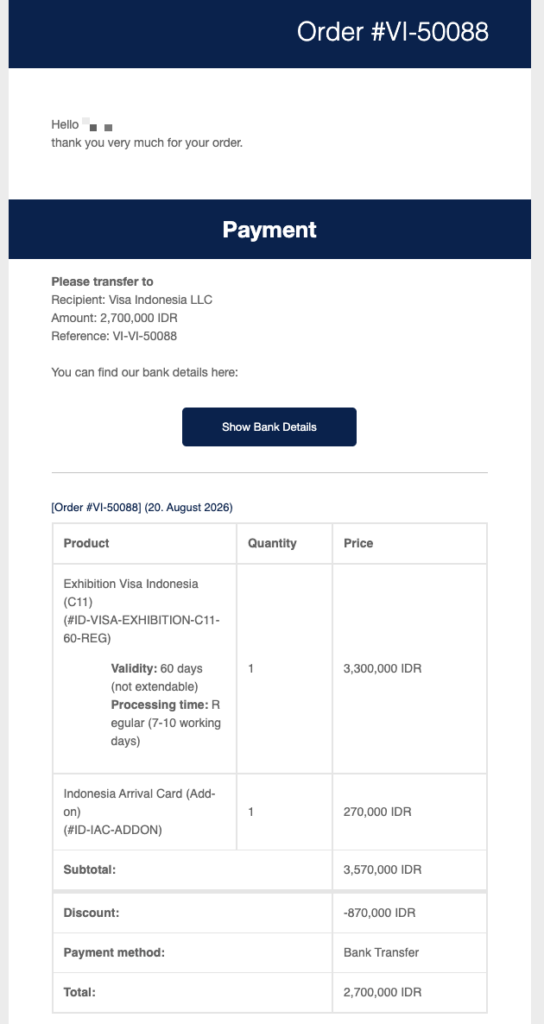
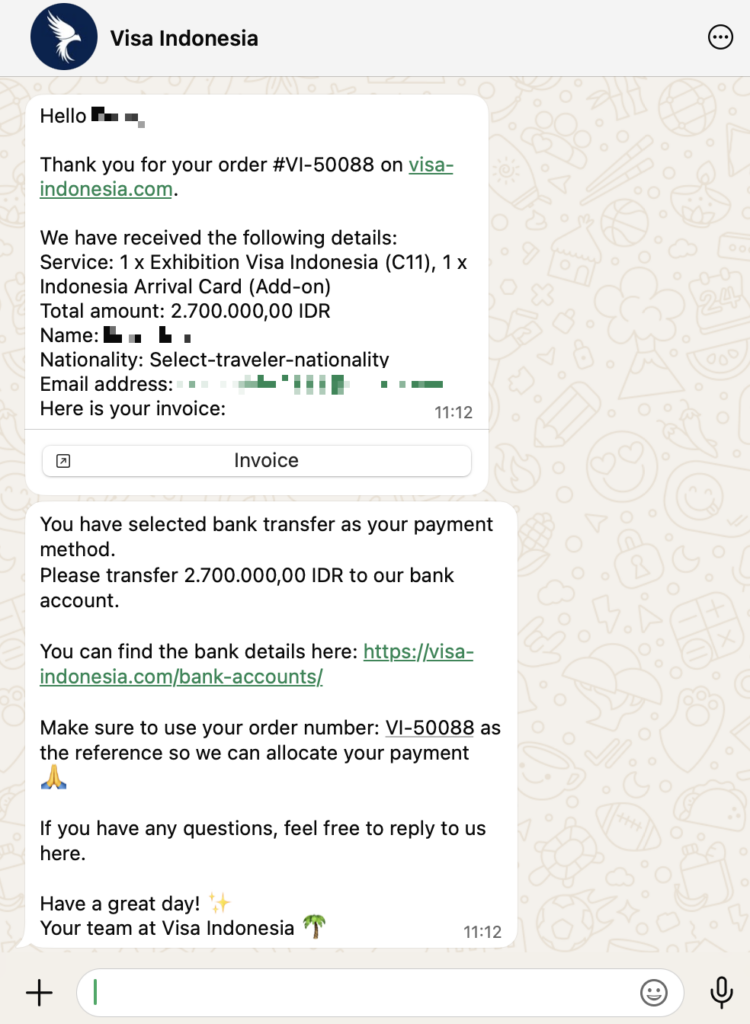
We also send the same confirmation to your email and to WhatsApp — so you’ll have it on hand no matter where you check first.
Step 10: Fill out the application form
Once we receive the payment, you will get access to the application form. The form will be shared with you directly in the browser and/or via email. Make sure to check your junk folder in case you can not find our email in your regular inbox.
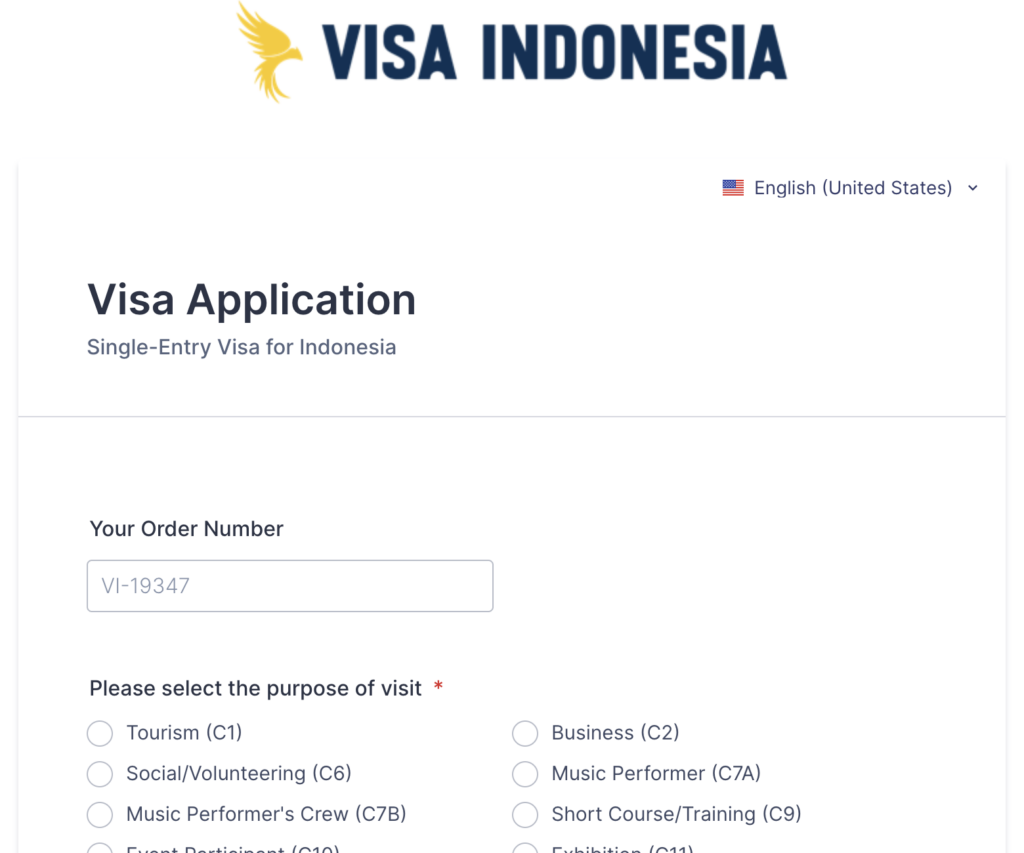
Please fill out the application form with all required data and documents in order to avoid any delays.
C11 Visa Application
Ready to Apply?
You now know exactly what to expect, from the product page to your e-Visa. Start your order whenever you’re ready, or reach out first if you’d rather talk it through.
Payment Methods Explained
Important: We can only start processing your visa application once we’ve received your payment, or, for bank transfers, proof of it. This is because we have to pay Indonesian immigration on your behalf before we can submit your application, so your payment is what gets everything moving.
The payment methods available to you depend on your selected currency and order total, and will be shown automatically at checkout.
| Method | Processing Fee | Notes |
|---|---|---|
| Bank Transfer | None | Include your reference number in the transfer description |
| Credit/Debit Card | Yes, shown at checkout | Visa, Mastercard, American Express and other major cards |
| Apple Pay / Google Pay | Yes, shown at checkout | — |
| Cryptocurrency | Varies | — |
Important: American Express is only available when your order is paid in USD. If you’re paying in another currency, choose a different card or payment method.
What Happens After You Place Your Order?
Placing your order is only the first step. Here’s what to expect next:
- Pay the amount due. If you chose bank transfer, transfer the exact amount shown, using your order number in the reference. Other payment methods are processed immediately.
- We confirm your payment. Once we’ve received it, you’ll be redirected to the visa application form.
- Complete the full application. Here you’ll enter your complete personal and travel details and upload your required documents (passport, photo, bank statement, invitation letter, …). Once we received your order you’ll receive an email with the application form.
- We review and submit. Our team checks your documents, prepares the supporting documents, and submits your application to Indonesian immigration.
- You receive your e-Visa. Once approved, we’ll send your e-Visa to you by email, ready to print or show digitally at check-in and on arrival.
Paying by Bank Transfer? Send Us Proof Right Away
Depending on your bank, a transfer can take anywhere from a few hours to a few days to actually arrive in our account — even though you’ve already sent it. To avoid losing that time, message us on WhatsApp (+62-855-7467-8883) or email as soon as you’ve made the transfer, with a screenshot or receipt as proof.
This lets us confirm your payment and start processing your visa immediately, instead of waiting for the transfer to show up on our end first.
What If My Payment Fails?
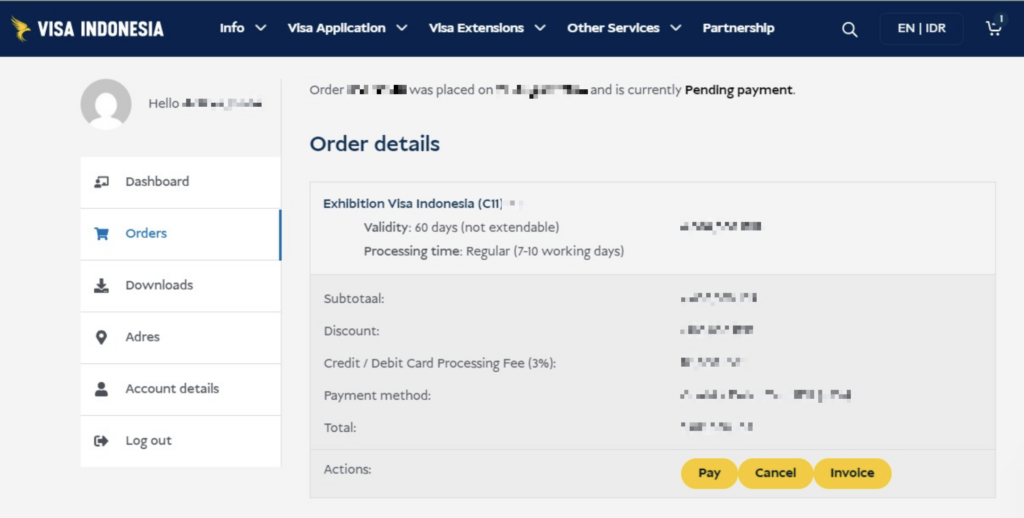
If your payment doesn’t go through, you don’t need to place a new order. When your order was created, an account was automatically set up for you, and your login details were sent to you automatically via email as well. To complete your payment:
- Log in to your account on our website -> My account
- Go to “Orders”
- Find your order and complete the payment from there — this works even if a previous payment attempt failed.
In case you still face any issues, please contact us via WhatsApp (+62-855-7467-8883) or email.
The Indonesia Arrival Card Explained
Alongside your C11 visa, you’ll also need an Indonesia Arrival Card before you travel — a digital customs and health declaration required of every visitor. At checkout, this is automatically added in the same quantity as your visa order, but it’s entirely optional to keep.
You have two options:
| Let Us Handle It | Submit It Yourself | |
|---|---|---|
| Cost | Small service fee | Free |
| When you can submit your details | Any time — as early as you like | Only starting 72 hours before arrival |
| Who completes it | We issue it for you, as soon as it becomes possible | You, on the official Arrival Card website |
| Best for | Not wanting to think about it again before your trip | Travelers happy to handle it themselves closer to departure |
Important: If you submit the Arrival Card yourself, note that the official form can only be completed starting 72 hours before your arrival in Indonesia — not earlier.
More information about the All Indonesia Arrival Card and how to apply can be found in our Arrival Card Guide.
Common Mistakes to Avoid
✗ Trying to apply without a guarantor. The C11 visa cannot be self-applied — you need a registered guarantor for every application.
✗ Forgetting your invitation letter. Prepare it early; a vague or incomplete letter can slow down your application once you reach the full form.
✗ Assuming the checkout form is your full application. It isn’t — it only collects basic contact details. The complete application with document upload comes after payment.
✗ Leaving your bank transfer without a reference number. Always include it so your payment can be matched to your order.
✗ Trying to submit your Arrival Card too early yourself. If you’re not using our Arrival Card service, remember the official form only opens 72 hours before arrival.
✗ Expecting American Express to work in every currency. It’s only available for orders paid in USD
Frequently Asked Questions
Can I buy multiple C11 visas in one order?
Yes. Increase the quantity on the product page or in your cart, and you’ll enter each traveler’s basic details separately at checkout.
Do I need to find my own sponsor or guarantor?
No. Sponsorship is included when you order through Visa-Indonesia.com, so you do not need to arrange a separate sponsor or guarantor.
When do I upload my C11 documents?
You upload the required documents after payment is confirmed, when you complete the full visa application form.
What happens after I pay?
After payment confirmation, you receive access to the full application form. Once you submit your details and documents, our team reviews the file, prepares the sponsor submission, and submits it to Indonesian Immigration.
What if my payment fails?
Do not create a new order. Log in to your account, open Orders, find the existing order, and retry the payment from there. If the issue continues, contact our support team.
What happens if Immigration asks for another document?
We will contact you with what is needed. Send the requested document as soon as possible so the application can continue without avoidable delay.
Is the checkout form the same as the visa application?
No. Checkout only collects basic contact details for your order. The full application, including document upload, happens after your payment is confirmed.
How will I know my order went through?
You’ll see a confirmation page in your browser immediately, plus a copy sent to your email and, if applicable, WhatsApp.
Ready to Apply or Extend Your Visa?
Let our visa specialists handle your application.





 English
  Bahasa Indonesia
  Español
  Italiano
  Français
  日本語
日本語  Nederlands
  繁體中文
繁體中文  한국어
한국어  Norsk bokmål
  Svenska
  Dansk
Dansk  Türkçe
  Polski
  香港中文
香港中文  简体中文
简体中文  Українська
  Русский
  Bahasa Melayu