


Cara Mengajukan Permohonan SKTT Secara Online dan Offline

Most foreigners hear all about visas, KITAS, maybe even KITAP. But SKTT? That one usually appears later, often when a bank officer, a civil servant, or a police officer leans over the desk and asks:
“Do you have your SKTT Surat Keterangan Tempat Tinggal?”
So let’s walk through exactly what that means, how to apply for SKTT without losing your mind, and how to make sure you’re fully registered in Indonesia’s system from both the immigration side and the population and civil registration side.
What SKTT Actually Is?
SKTT stands for Surat Keterangan Tempat Tinggal. You will see different translations for it, but the easiest way to remember it is this: SKTT is a residency certificate for foreigners that tells the Indonesian government, officially, “this is where you live” while you are in the country on a izin tinggal sementara.
In practice, SKTT sits between two government offices. Immigration Office and the population and civil registration authority (Disdukcapil).
Immigration focuses on whether you’re allowed to stay in Indonesia, while Disdukcapil focuses on where you live and how you’re recorded in the population system. SKTT connects these two: it proves to Immigration that a KITAS holder is properly registered, and it gives Disdukcapil an official record of a foreigner’s address and residency status.
SKTT vs KITAS vs KTP-OA (How They Fit Together)
Let’s untangle the three you’ll hear the most:
- KITAS (Izin Tinggal Terbatas) – your immigration status. It’s your official proof from the kantor imigrasi that you’re allowed to stay in the country for a specific purpose and validity period.
- SKTT (Surat Keterangan Tempat Tinggal) – your local residency registration at Disdukcapil. It’s the certificate of residence that confirms you actually live at a certain alamat.
- KTP OA (Foreigner ID) – this is what you get as a long-term resident on KITAP. It replaces SKTT once you transition to permanent stay.
So if KITAS is the big green light from immigration, SKTT is the “okay, we’ve officially logged where you are” from the population and civil registration system.
Deadlines, Validity, and Penalties
When You Have to Apply
When you first become one of the foreigners holding KITAS, the clock starts ticking.
Most regional guidelines say you must apply for SKTT and complete the application procedure within a short time after your KITAS becomes active, often described as around 14 days from the date of issuance or from your arrival.
Every city works it a little differently, so here’s a safe rule of thumb:
Treat 14 days as the maximum. Sooner is always better.
If you’re reading this and you’re way past that? Don’t panic. You can still submit a new application and sort it out, but you may need an application letter explaining your situation, and you might run into late-registration issues.
How Long Is SKTT Valid
The SKTT validity period is tied to your KITAS:
- If your KITAS is valid for 1 year, your SKTT will normally cover the same period.
- When you go for your KITAS extension, you should also plan on refreshing your SKTT.
- If you change city or regency, you’ll need to go through a new registration in your new region.
Think of your SKTT as a mirror: whatever happens to your limited stay permit, the mirror has to be updated.
What Happens If You Skip It
If you ignore SKTT completely, you’re technically missing a wajib piece of the legal puzzle.
Possible risks include:
- Administrative issues or fines under population rules.
- More friction when you try to buka rekening bank or register a vehicle.
- Extra questions during immigration processes because your population data doesn’t line up with your residence status.
You might coast along for a while without it, but the moment you need to show that you’re properly registered, you’ll wish you’d done the SKTT proses aplikasi early.
Who Needs to Apply for SKTT?
By law, all foreigners with a Limited Stay Permit (ITAS/KITAS) must apply for SKTT. Let’s look at some typical cases where SKTT is required.
Foreign Workers (Employment KITAS)
If you’re working for a company in Indonesia on a work stay permit KITAS, you:
- Hold a izin tinggal terbatas for employment.
- Usually, you have a izin kerja or job notification attached to it.
- They are exactly the kind of warga negara asing Disdukcapil expects to see in their system.
Your sponsor (the company) may already have a routine: they might help you with the SKTT application procedure as part of your onboarding.
Investor / Director KITAS Holders
If you’re a shareholder or director with an investor KITAS, you’re still a foreign national holding a KITAS. The difference is:
- Your sponsor is a PT PMA or Indonesian legal entity rather than an individual.
- You’ll be asked for company documentation during the SKTT proses aplikasi.
The practical impact is the same: your tempat tinggal gets logged in the population system and the certificate serves as proof of that.
Spouse / Family KITAS
If your Indonesian spouse or parent sponsors your KITAS:
- Your Indonesian partner’s identitas is central; they’re listed as your sponsor.
- Their KTP and family card, along with your marriage or birth certificate, sit front and centre among the dokumen yang diperlukan.
It’s common for the civil registration office to insist that your residential address matches what’s shown on your spouse’s family card, or that you bring supporting letters from your local village or neighbourhood.
Retirement and Student KITAS
Retirees and students are also foreigners holding KITAS and foreigners residing in Indonesia long-term.
Your sponsor might be:
- A retirement agency.
- A university or educational institution.
Either way, the same SKTT logic applies: you’re in the population system, not just the immigration one.
Required Documents for SKTT
Obtaining SKTT requires careful preparation of documents and understanding the requirements before starting the application procedures.
This is the part where people often get overwhelmed. Let’s tame it.
Each city or regency has slightly specific requirements, but the core list is surprisingly similar everywhere.
Core Identity & Immigration Papers
You can’t run from these:
- Anda paspor (identity page plus your latest entry stamp and sticker, e-visa, or electronic KITAS info).
- Anda KITAS or electronic stay permit KITAS printout, showing that your residence status is active.
These are the foundations of your SKTT application; without them, there’s no proof you have a izin tinggal sementara at all.
Address & Local Reporting Papers
Next, the local side. To prove where you live, you usually need:
- A surat keterangan domisili from your neighbourhood: often issued by RT/RW or banjar and then legalized at the kelurahan.
- Sometimes, a laporan at the police station (STM) or, in specific regions, a recommendation from another government department like Kesbangpol.
If you’re renting, some regions also ask for a simple letter from your landlord saying they’re okay with you using the property as your official alamat.
These are the pieces that turn “foreigner in Indonesia” into “foreigner registered at this one spot on the map.”
Sponsor and Family Documents
Depending on your case, Disdukcapil will want:
- Your sponsor’s KTP and family card (for Warga Negara Indonesia sponsoring you as spouse or parent).
- Company documents (for corporate sponsors).
- Marriage certificates or birth certificates if you’re a dependent.
During the proses aplikasi, these are checked to confirm that your sponsor and your residential address actually line up with your story.
Photos and Digital Files
Most regions still love printed photos, but more and more are also asking for files in digital format:
- Colour photo with a specific background (often red).
- A certain size (for example, 3×4 or 4×6 cm).
If you’re going through an online system, those photos and scans will be part of all the necessary documents you upload.
Put all this together in a folder so you always have all the documents at hand, both as printouts and as scans.
How to Apply for SKTT Online
Before you begin the SKTT process, first check whether your city or regency supports online SKTT applications. Not all regions in Indonesia use the same system, so some still require you to apply offline at Disdukcapil.
In this guide, we’ll walk you through how to apply for SKTT online in Jakarta, step by step.
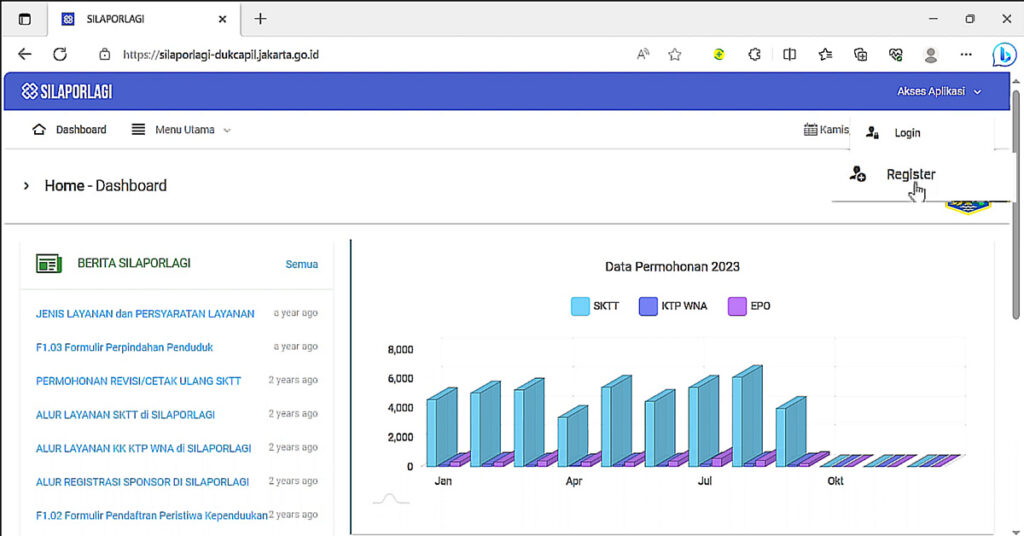
Step 1 – Go to the official SKTT website
First, open the official SKTT / Disdukcapil online system.
Always make sure you’re on the official government site, not a copy or an ad.
You can only apply online if you already have your KITAS / ITAS in hand, so make sure that part is done first.
Step 2 – Register a new account
Before you can apply for SKTT, you need to create an account on the system.
During registration, you will be asked to enter your basic data and upload several documents. Prepare clear scans or photos (front side, readable text) of:
- Indonesian ID card (KTP) – usually your Indonesian spouse/sponsor
- Surat nikah (Akta Nikah)
- Family card (Kartu Keluarga / KK)
- A selfie holding the KTP (your face and the KTP must be clearly visible)
Follow the on-screen fields one by one. The system will guide you through the data entry and uploads. At the end, you’ll create your own password for this SKTT portal.
Note: this is different from the immigration website. For immigration, they usually give you a password. For SKTT/SILAP, you create it yourself and must remember it.
Step 3 – Log in to your account

Once your account is registered:
- Go back to the login page.
- Masukkan data Anda KTP number (the one you used to register) as your username.
- Enter the password you just created.
- Click Masuk.
If everything is correct, you’ll land on the main dashboard of the system.
Step 4 – Start a new SKTT application

On the main menu, look for the option related to SKTT atau Surat Keterangan Tempat Tinggal.
Then:
- Choose the SKTT reporting / application menu.
- Untuk Type of application (Jenis permohonan), select “Baru” (New), because this is your first SKTT.
The system will then open a sequence of forms. You’ll fill them in section by section.
Step 5 – Fill in Your Address Detail

The first part usually covers family address data for foreigners in Indonesia.
Here you enter:
- The full address where the foreigner actually lives in Indonesia
- All requested details like street name, house number, RT/RW, kelurahan, kecamatan, city, province, and postal code
- Any other fields shown are related to the household or family address
Follow the form carefully and fill in every required field as it appears.
This section is basically telling the government: “This is the exact address where this foreigner lives.”
Step 6 – Fill in “Individual Data” (Data Individu)
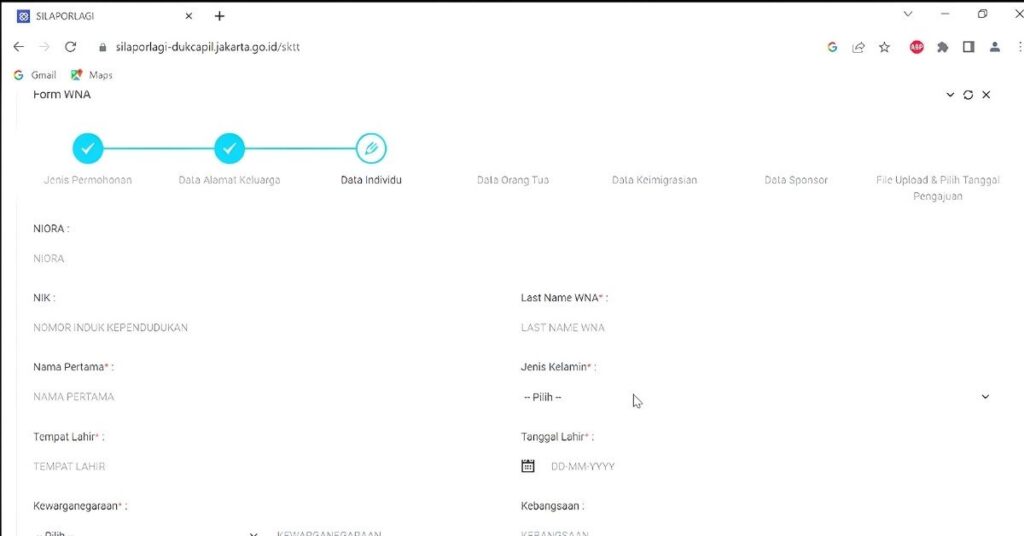
Next, you move to the individual data for the foreigner.
In this part, you’ll be asked for personal information for the foreign national (the KITAS holder), such as:
- Full name
- Date and place of birth
- Kebangsaan
- Gender
- Religion, marital status (if requested)
- Other personal details shown on the form
Pay attention to these specific fields mentioned in the transcript:
- NIK (Nomor Induk Kependudukan) for the foreigner:
- Leave this field blank.
- The foreigner does not have an Indonesian NIK yet – they will receive a foreigner ID number only after the SKTT is issued.
- Leave this field blank.
- NIORA (or similar foreigner ID number):
- This number can usually be found on the KITAS / ITAS.
- This number can usually be found on the KITAS / ITAS.
- ITAS number / KITAS number:
- Use the “Permit Number” printed on the KITAS / ITAS document.
- The same permit number also appears on the MER / MERP page (Multiple Exit Re-entry Permit).
- Use the “Permit Number” printed on the KITAS / ITAS document.
Fill everything exactly as written on the passport and KITAS/ITAS. Small mistakes in spelling or numbers can cause rejection.
Step 7 – Fill in “Parents’ Data” (Data Orang Tua)

The next form asks for the parents’ data of the foreigner.
You’ll usually need to enter:
- Full name of the father
- Full name of the mother
According to the transcript:
- Anda do not need to fill in their NIK.
- Just write their full names clearly, as shown on the foreigner’s documents or birth certificate.
If there are optional fields that do not apply, you can leave them blank or follow the system’s instructions.
Step 8 – Fill in “Immigration Data” (Data Imigrasi)
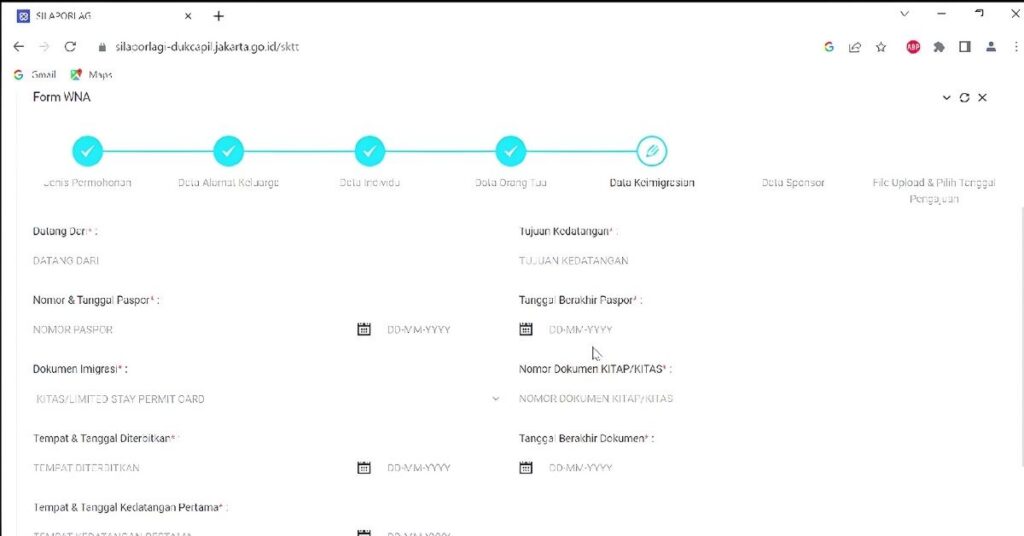
Then you move to the immigration data section.
Here you’ll provide details related to the foreigner’s stay permit, such as:
- Type of stay permit (KITAS / limited stay permit)
- The immigration office that issued the permit
- Date of issue and expiry date (if requested)
- Entry details and other immigration-related information are shown on the form
The important field mentioned in the transcript:
- “Nomor dokumen KITAP/KITAS” (Document number for KITAS/KITAP):
- Again, use the “Permit Number” on the KITAS / ITAS page.
- For example, for index C317, this number usually ends with a specific letter such as “X” (as mentioned in the video).
- Again, use the “Permit Number” on the KITAS / ITAS page.
Read the labels carefully and match every entry with what appears on the KITAS / ITAS and MER/MERP.
Step 9 – Check “Sponsor Data” (Data Sponsor)
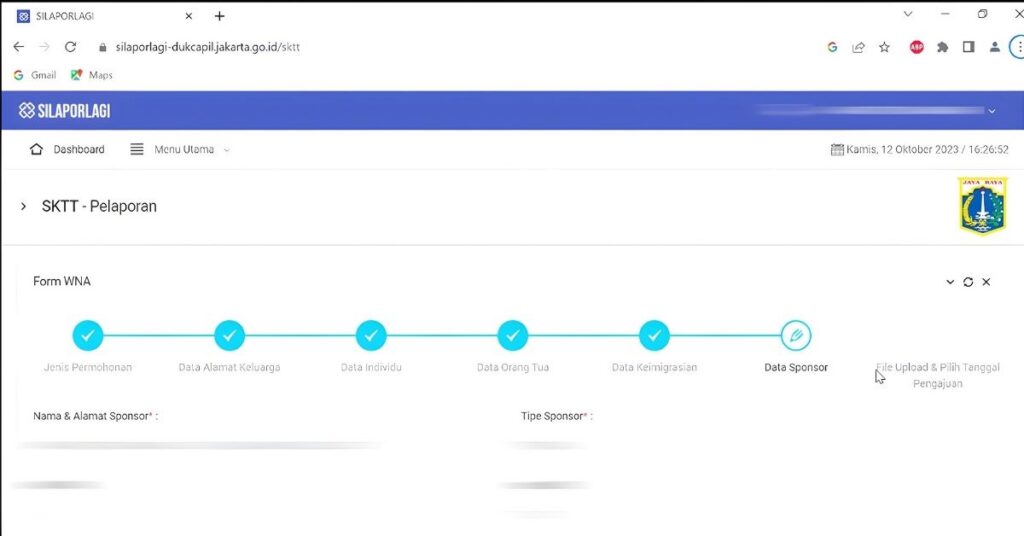
Next is the sponsor data section.
Because you already filled in sponsor information during registration, in many cases, this part will be auto-filled by the system. This typically includes:
- Sponsor’s full name
- Sponsor’s KTP number
- Sponsor’s address and contact details
If, for some reason, the fields are not filled automatically:
- Type in the sponsor’s data manually, one field at a time.
- Make sure it matches the documents you’re going to upload (KTP, KK, etc.).
Step 10 – Upload all required documents

After the data sections, you’ll reach the document upload halaman.
The system will list what you need to upload and also show the maximum file size. According to the transcript:
- Each document file must be no more than 2 MB.
Typical documents you may need to upload include:
- Paspor of the foreigner (identity page)
- KITAS / ITAS, termasuk all relevant pages (ITAS page and MER/MERP page)
- Surat nikah (all pages if it has more than one)
- Family card (KK)
- KTP of the Indonesian spouse/sponsor
- Photo (for example, 3×4 cm photo of the foreigner, clear face, good quality)
A few important practical points from the transcript:
- Untuk KITAS / ITAS:
- Upload all related pages, not only the ITAS page.
- The user in the video had their application rejected once because they uploaded only the ITAS page and tidak the MER/MERP page.
- To avoid rejection, make sure every required page is uploaded.
- Upload all related pages, not only the ITAS page.
- For documents with more than one page (for example, a 2-page marriage certificate):
- The upload field usually lets you browse one file per slot.
- Use the “Add file” button (often shown as a green button) to upload the second page and any extra pages.
- Do not combine different documents into one file; treat each document as its own set of uploads.
- The upload field usually lets you browse one file per slot.
- For photos:
- You can crop or resize the photo to about a 3×4 size as mentioned.
- Make sure the file is clear, not blurry, and under 2 MB.
- You can crop or resize the photo to about a 3×4 size as mentioned.
Take your time on this step. Most rejections happen because something is missing or the wrong pages were uploaded.
Step 11 – Choose your SKTT printing date
After uploading all documents correctly, the system will ask you to select a date for SKTT printing/processing from a calendar.
On the calendar:
- Green dates = available
- Orange dates = not available
Simply click one of the green dates that works for you.
In the video, the speaker just picked a date as an example so she could show the full process, but in real life, choose a date that suits your schedule and the system availability.
Step 12 – Save, submit, and send your application
Once all fields and uploads are complete and the date is selected:
- Click Save to make sure nothing is lost.
- Click Submit / Ajukan to officially send your SKTT application.
After submitting, look at the top part of the page or your dashboard:
- You will see a blue (light blue) bar indicating your SKTT report/application.
- It will show the number of applications, for example, “1”, indicating one active SKTT application.
This is also where you can monitor your SKTT status.
Step 13 – Monitor your application status

Use the monitoring menu or section to check whether your SKTT is:
- Still being processed
- Rejected (with a note on what was wrong)
- Approved and ready to print
According to the transcript:
- Normal processing time is up to 3 days.
- If your application is rejected, fix what they asked for (for example, missing document pages) and resubmit.
- In the video, the speaker was rejected once because she did not upload the full KITAS + MER, so in total it took her around 5 days from first submission to final approval.
Step 14 – Download and print your SKTT

When the status in the system shows that your SKTT is approved, you can:
- Unduh the SKTT directly from the portal.
- Print it yourself on good quality paper.
The nice part is: once approved, you do not need to go to the office in person just to pick it up. The digital printout from the system is the SKTT you need to keep and use.
SKTT Application Offline Procedure
Let’s walk through a typical offline flow, assuming your city still does things the traditional way.
Step 1 – Confirm Local Rules
Before you touch a printer, call your civil registration office or check their website for documents you have to prepare. Each region has its own checklist and may add:
- Extra letters from your local village officials.
- Additional certificates for certain types of foreign nationals holding a KITAS.
A five-minute phone call here can save you three wasted trips later.
Step 2 – Gather Your File
Now gather:
- Passport + photocopies.
- KITAS + photocopies.
- Sponsor and family documents.
- Domicile and police letters.
Treat this like building a case file. You want to walk in with everything so the application procedure doesn’t stall halfway.
Step 3 – Fill Out the Forms
At Disdukcapil, you’ll get forms that ask for:
- Your personal identitas details.
- Your parents’ names.
- Anda residential address.
- Your immigration data (type of stay permit, KITAS, visa number, and so on).
Fill them out slowly and carefully. Use the same spelling as in your paspor and KITAS. A single typo can be enough to trigger a request for corrections.
Step 4 – Submit and Answer Questions
Hand over your file. The officer may:
- Ask basic questions about your residence status.
- Double-check your sponsor’s information.
- Verify that your application letter (if any) aligns with what the forms say.
Once they’re happy, your SKTT application moves into the system, and you move into the waiting phase.
Step 5 – SKTT Processing Time and Collecting
Different cities have different waktu pemrosesan standards, but common patterns are:
- A few business days in smooth cases.
- Up to a couple of weeks if the office is busy or extra approvals are needed.
Once your SKTT is ready, you’ll usually get:
- A call or message telling you to come back, or
- A pickup date is written on a small receipt.
You go back to Disdukcapil, sign where you’re told, and walk out with your residency certificate in hand.
What You Can Do with SKTT
Over time, your SKTT or successor documents may show up when you:
- Register a vehicle in your own name.
- Try to open a rekening bank or apply for certain financial products.
- Enroll kids in local schools.
- Deal with more complex interactions between immigration and population systems, especially if your tempat tinggal or sponsorship changes.
It’s a small sheet of paper (or card), but it quietly proves you aren’t just floating around on a izin kerja or family KITAS without leaving a trace at the civil registration level.
Do-It-Yourself vs Using an Visa-Indonesia Service
Finally, the big tactical question: should you handle the SKTT proses aplikasi yourself or outsource it?
When DIY Makes Sense
Handle it yourself if:
- You’re reasonably confident in Bahasa Indonesia.
- You can spare a day or two for queues and administrative tasks.
- Your case is straightforward: one city, one sponsor, one residential address.
In that contoh, you’ll learn how things work, develop a better feel for local bureaucracy, and keep costs down.
When to Choose Visa-Indonesia
Consider working with a Visa-Indonesia when:
- You’ve moved cities and need to shut down your previous SKTT and open a new record in another region.
- You’re behind schedule and want to minimise questions about late registration.
- You simply don’t have time to chase every department involved.
Visa-Indonesia will:
- Help you collect all the necessary documents.
- Walk you through the application procedure or even represent you under a power of attorney.
- Keep an eye on your residence status so your SKTT stays in sync with your KITAS lifecycle.
Big Picture: Treat SKTT as Part of Your KITAS, Not an Optional Extra
If there’s one mindset shift that makes this easier, it’s this:
Don’t treat SKTT as an optional add-on. Treat it as the second half of your residency story.
Immigration handles your KITAS, but your civil registration office handles where you live and how that’s recorded. When both sides are set up properly:
- Your legal residency looks clean.
- Your future renewals and changes (like switching sponsors or moving house) are simpler.
- You’re less likely to hit weird roadblocks when you need a certificate of residence, a vehicle registration, or proof of address for any new proses aplikasi.
So once your sktt surat keterangan tempat status is lined up, keep copies of your certificate of residence, and keep an eye on the validity period every time you renew or adjust your izin tinggal terbatas.
It’s one more file in the folder, sure. But it’s also one less thing to worry about when the next official behind the desk looks you in the eye and asks, “Do you have your SKTT?”
Siap Mengajukan atau Memperpanjang Visa Anda?
Biarkan spesialis visa kami menangani aplikasi Anda.